In a fit of what can only be called extremely poor judgment, the cats decided to make a break for the backyard as I was hauling the weeks of accumulated cardboard boxes and packing materials out to the alley (side note: we have ALL the pieces of the bathroom now). It's in the upper 30's, which feels downright warm after the single-digit temps we had earlier in the week, but the cats were totally unprepared for the snow. They managed to find some patches of grass to sit and then chew on.
Also, I finally put the hammock away...
Nom nom nom.
Oh hai!
Saturday, December 11, 2010
Wednesday, October 27, 2010
Wednesday, August 25, 2010
Monday, February 22, 2010
Master Bedroom
We got some new lamps and I finally got around to painting the furniture a color that doesn't clash horribly with the walls in the new bedroom. Let's take a tour of the process, shall we?
First, I started picking at the buckling paint on the crappy plaster walls. This of course escalated into a full-on OCD paint-scraping bonanza.
So after I had made a giant mess and scraped most of the paint off two walls, Jason decided that it would be best to start from scratch and just gut the room down to the studs.
I'm pretty sure this is where the lazy damn cats spend most of their time while we're at work, paying for the roof over their furry little heads.
Dexter seems to be enjoying it.
And, these are the ceiling lights we got for the upstairs rooms. Aren't they cute? The shades match the dining room chandelier. The flash made the etching and texture in the glass stand out more than it does in real life; it's pretty subtle, especially when the light is on.
One room down, 9 to go! Oh man, that was supposed to be uplifting but now that I've done the math it's just depressing.
First, I started picking at the buckling paint on the crappy plaster walls. This of course escalated into a full-on OCD paint-scraping bonanza.
So after I had made a giant mess and scraped most of the paint off two walls, Jason decided that it would be best to start from scratch and just gut the room down to the studs.
The room sat like this for about 9 months, while we were squeezed into the then-crappy 2nd bedroom. Although the two rooms are exactly the same size, the other room had awkward window, door, and shelf placement that made it feel really small. We had to wait until the support beam in the basement was replaced before we could put up drywall.
Eventually, Jason re-framed the closet, combining the two tiny closets and funky pass-through into one giant closet with doors into both rooms. By then the beam was done, and the drywallers were in and out in 2 days. They did kind of a crappy job but at least we have walls now.
Dexter seems to be enjoying it.
And, these are the ceiling lights we got for the upstairs rooms. Aren't they cute? The shades match the dining room chandelier. The flash made the etching and texture in the glass stand out more than it does in real life; it's pretty subtle, especially when the light is on.
One room down, 9 to go! Oh man, that was supposed to be uplifting but now that I've done the math it's just depressing.
Saturday, February 20, 2010
It Really Ties The Room Together
I love this rug so much. And it was crazy-cheap on Overstock, which makes me love it more. It's very cushy and I only had to vacuum it twice before it stopped making me sneeze (I'm allergic to wool).
I realized that I don't have any current photos of the living room up since we de-uglied it, so here's a full tour.
Don't worry, the brackets are in studs, there is no danger of being clobbered by books when you sit on the couch. The space between the shelves and couch always looks huge in photos but it doesn't seem so bad in person. I can't think of what to put there that won't make the wall look too busy.
Here's a better view of the rug. Also, I just rewired the lamp on the right, which had belonged to my great-grandmother. The chair on the left also belonged to her.
This is where I waste most of my time... Up top you'll notice a Bolesta original, painted by grandpa and the only non-Bob Ross forest scene I think he ever did.
Saturday, January 9, 2010
Dining Room Light
Finally! Goodbye horrible ceiling fan, hello pretty late-Victorian reproduction light! Who puts a ceiling fan in a dining room? The mind reels.
In case you can't tell how ugly it is, here's a closeup:
Unfortunately this one didn't come in very focused. In case you don't speak hundred year old house, I have translated for you.
After that, we were able to install a new ceiling box and then the new light. So pretty!
In case you can't tell how ugly it is, here's a closeup:
Unfortunately this one didn't come in very focused. In case you don't speak hundred year old house, I have translated for you.
Yeah, that's right, gas pipe. When I bought the fixture, which is a gas light reproduction, I thought it would be period-appropriate to the house, but I didn't anticipate having to actually deal with leftover infrastructure (I should have known better). After trying and failing with the angle grinder and dremmel, Jason broke out the sawsall.
After that, we were able to install a new ceiling box and then the new light. So pretty!
Thursday, January 7, 2010
New Light Switches
Push-button light switches! (Shout-out to Adam/Lisa/Lois for giving them to us!) We finally got around to buying switch plates and installing them. I wasn't a fan of the brass finish at first, but with the stripped doorknobs and the dark wood, they look really nice:
Here's a close-up:
Here's a close-up:
Sunday, January 3, 2010
2009 Recap
- Replaced the beam
- Cut down all the scrageldy, half-dead trees and bushes
- Took out all the stumps (so much work it gets its own bullet point)
- Landscaped back yard, planted garden, bought hammock
- Painted front porch, installed porch swing (2 major life goals now accomplished)
- Installed clay brick pavers in front
- Landscaped front yard
- New roof
- Demo'd bedroom closets, framed in attic access
- Rewired master bedroom
- Drywalled master bedroom
- Refinished master bedroom and hallway floors, as well as bedroom and closet doors/trim
- Trimmed out bay windows in dining room
- Demo'd downstairs half bath
- Install new ceiling lights
- Restore downstairs bathroom
- Refinish and install new front door
- Repair foundation of back porch
- Install new door & windows on back porch
- Squirrel-proof garden (or eliminate squirrels)
- Finish stripping and then refinish downstairs trim (yeah, right)
- Install shoe moulding
- Rebuild stairs (a girl can dream...)
Downstairs Bathroom
Originally looked like this. The wall tile in no way matched the floor tile, other than both being in the greenish family, though they appear to nearly match in the photo. The wall tile represents pretty accurately here, but the floor tiles are sage/forest green, and clashed horribly with the walls.

Then, even though it pained me to paint the wall tile, it looked so much better:

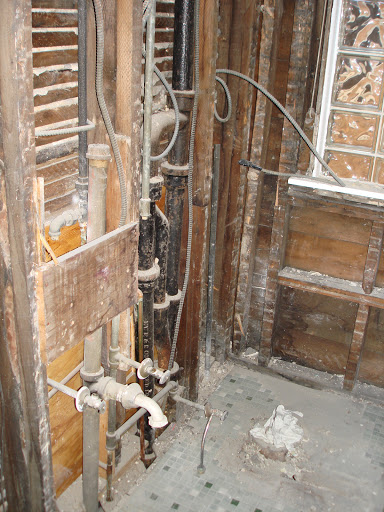
And now...


Then, even though it pained me to paint the wall tile, it looked so much better:

And now...

Subscribe to:
Comments (Atom)


